- After updating to macOS Sequoia, some customers discover their desktop recordsdata lacking because of adjustments in iCloud settings, hidden file attributes, app compatibility, or file system glitches. The recordsdata are normally not misplaced and will be recovered.
- To recuperate lacking recordsdata, you must first test and alter iCloud settings, unhide recordsdata utilizing Terminal or Finder, and restore recordsdata from the iCloud Archive. If these strategies fail, utilizing information restoration software program or restoring from backups like Time Machine might help.
Updating your Mac to the most recent macOS model, Sequoia, will be thrilling because it brings new options and enhancements. Nevertheless, some users have encountered a frustrating issue after the replace: their desktop recordsdata appear to have disappeared. In the event you’re going through this drawback, don’t panic—your recordsdata are seemingly not misplaced for good. This information will stroll you thru numerous strategies to recuperate your lacking recordsdata and forestall this from taking place once more sooner or later.
Understanding why recordsdata could go lacking after an replace might help you discover the proper resolution sooner. In lots of instances, it’s because of adjustments in settings, file visibility, or compatibility points with sure functions. By following these easy steps, you’ll have the ability to get your desktop again to regular and regain entry to your necessary recordsdata.
Why Do Recordsdata Disappear After the macOS Sequoia Replace?
When updating to macOS Sequoia, recordsdata can typically disappear due to a couple widespread causes:
- iCloud Sync Adjustments: The replace could have altered iCloud Drive settings, shifting desktop recordsdata to iCloud.
- Hidden File Attributes: Recordsdata could also be hidden fairly than deleted, affecting their visibility.
- Compatibility Points: Apps like Parallels could battle with the brand new macOS, inflicting recordsdata to grow to be inaccessible.
- File System Glitches: Sometimes, updates trigger system errors that influence file indexing or entry.
Lacking Recordsdata After macOS Sequoia Replace? Right here’s Methods to Restore Your Desktop Recordsdata Rapidly
In case your desktop recordsdata are lacking after updating to macOS Sequoia, comply with these strategies to recuperate them. Every technique addresses a special doable trigger, so strive them in sequence till you restore your recordsdata.
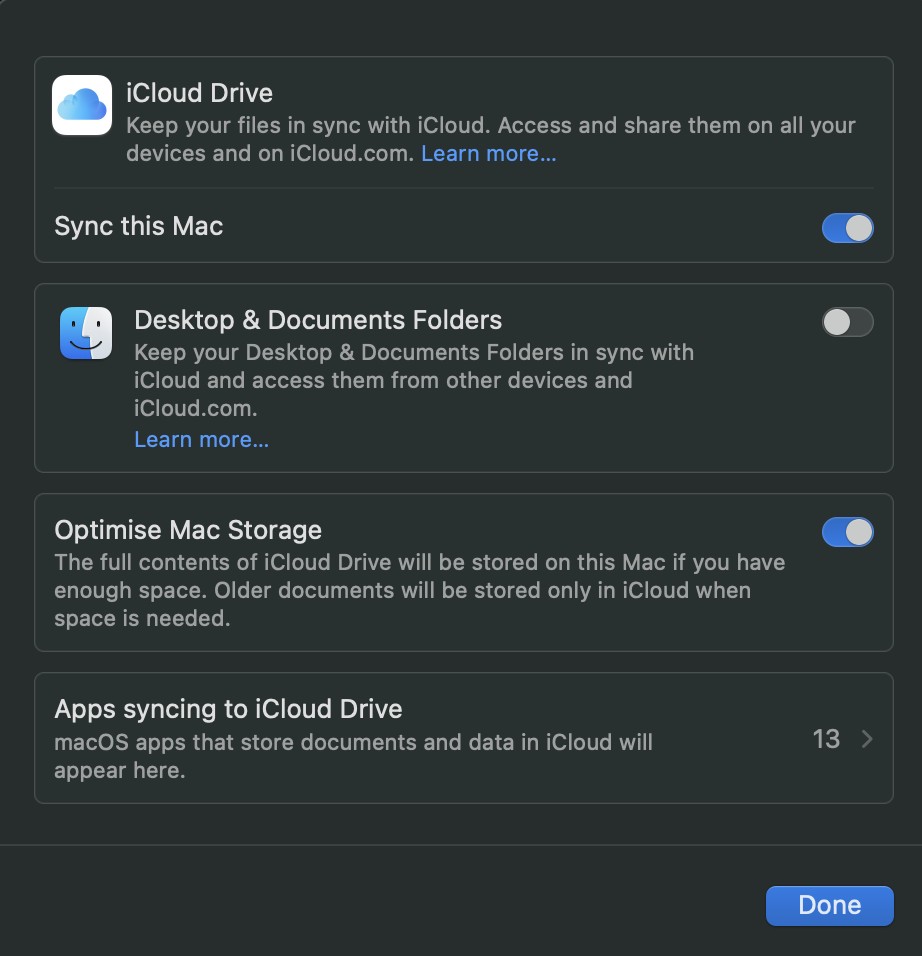
Regulate iCloud Settings
When macOS updates, it might change or allow iCloud settings that have an effect on file areas. Right here’s how one can test and alter your iCloud settings:
- Open System Settings in your Mac.
- Go to iCloud > iCloud Drive.
- Search for the Desktop & Paperwork Folders choice and guarantee it’s turned on. If it’s already on, strive toggling it off, ready a second, after which turning it again on.

- This might help resync recordsdata between iCloud and your desktop.
- When you’ve adjusted the settings, test your desktop to see if the recordsdata have reappeared.
- If recordsdata seem in iCloud however not in your desktop, it’s possible you’ll have to manually transfer them again from iCloud Drive to your native desktop.
Unhide Recordsdata Utilizing Terminal
Generally, recordsdata aren’t deleted however are merely hidden. You should utilize Terminal to unhide these recordsdata. Right here’s how:
- Open Terminal, which you could find in Purposes > Utilities.
- In Terminal, kind the next command and press Enter:
sudo chflags -R nohidden ~/Desktop
- This command removes the hidden attribute from all recordsdata in your desktop.
- When prompted, enter your admin password, then press Enter.
- Test your desktop to see if the recordsdata are actually seen.
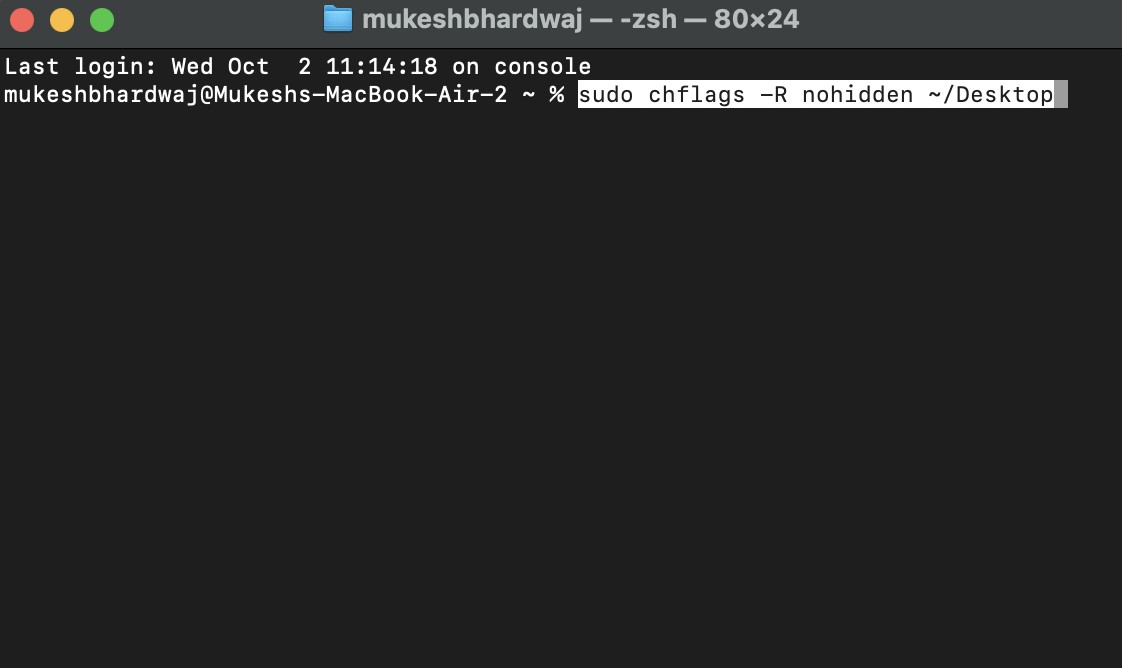
This technique ought to reveal any recordsdata that have been marked as hidden through the replace.
Reveal Hidden Recordsdata with Finder
In the event you suspect that recordsdata are hidden however favor a non-Terminal strategy, you need to use Finder’s shortcut to point out hidden recordsdata:
- Go to your desktop or open a Finder window.
- Press Shift + Command + Interval (.). This keyboard shortcut toggles the visibility of hidden recordsdata in Finder.
- Look in your desktop to see if the lacking recordsdata seem.
If this works, the recordsdata ought to now be seen in your desktop. Understand that this may even present different hidden system recordsdata, so press the shortcut once more to return to regular view when you’ve situated your recordsdata.
Restore from iCloud Archive
In some instances, recordsdata may need been moved to an archive inside iCloud. You may retrieve them as follows:
- Open Finder and choose Go from the menu bar.
- Click on Go to Folder… and enter the next path:
~/iCloud Drive (Archive) - Press Enter. This opens the iCloud Drive Archive, the place recordsdata are saved in the event that they’re faraway from the desktop because of sync settings.
- Flick thru the folders to find your lacking recordsdata.
- Drag the recordsdata from the archive again to your desktop or every other most popular location in your Mac.
This technique is especially helpful if recordsdata are saved briefly in iCloud through the replace.
Use Knowledge Restoration Software program
In the event you’re unable to recuperate recordsdata by the above strategies, information restoration software program could assist. Right here’s how one can use EaseUS Knowledge Restoration Wizard for Mac or comparable software program:
- Obtain and set up EaseUS Knowledge Restoration Wizard for Mac.
- Open the software program and choose the disk or location the place your desktop recordsdata have been initially saved (normally the primary arduous drive).
- Click on Scan to begin looking for misplaced recordsdata. The software program will show a listing of recordsdata it might recuperate.
- Use the file kind and path filters to find particular recordsdata it’s worthwhile to recuperate.
- Choose the recordsdata you need to restore and click on Get better. Select a brand new location, equivalent to your desktop or an exterior drive, to keep away from overwriting different recordsdata.
Restoration software program can usually retrieve recordsdata that have been mistakenly deleted or misplaced through the replace course of.
Restore from Backups
In the event you’ve been utilizing Time Machine or one other backup technique, restoring from a backup is a dependable approach to recuperate recordsdata:
- Join your backup drive to your Mac.
- Open Time Machine by clicking the Time Machine icon within the menu bar, or go to System Settings > Time Machine.
- Use the timeline on the proper to pick out a backup date earlier than the replace.
- Navigate to the Desktop folder inside Time Machine’s interface to view your recordsdata as they have been earlier than the replace.
- Choose the recordsdata or folders you want to restore, then click on Restore.
- When you’ve got recordsdata saved on an exterior backup drive, you can even manually find and drag them again to your desktop.
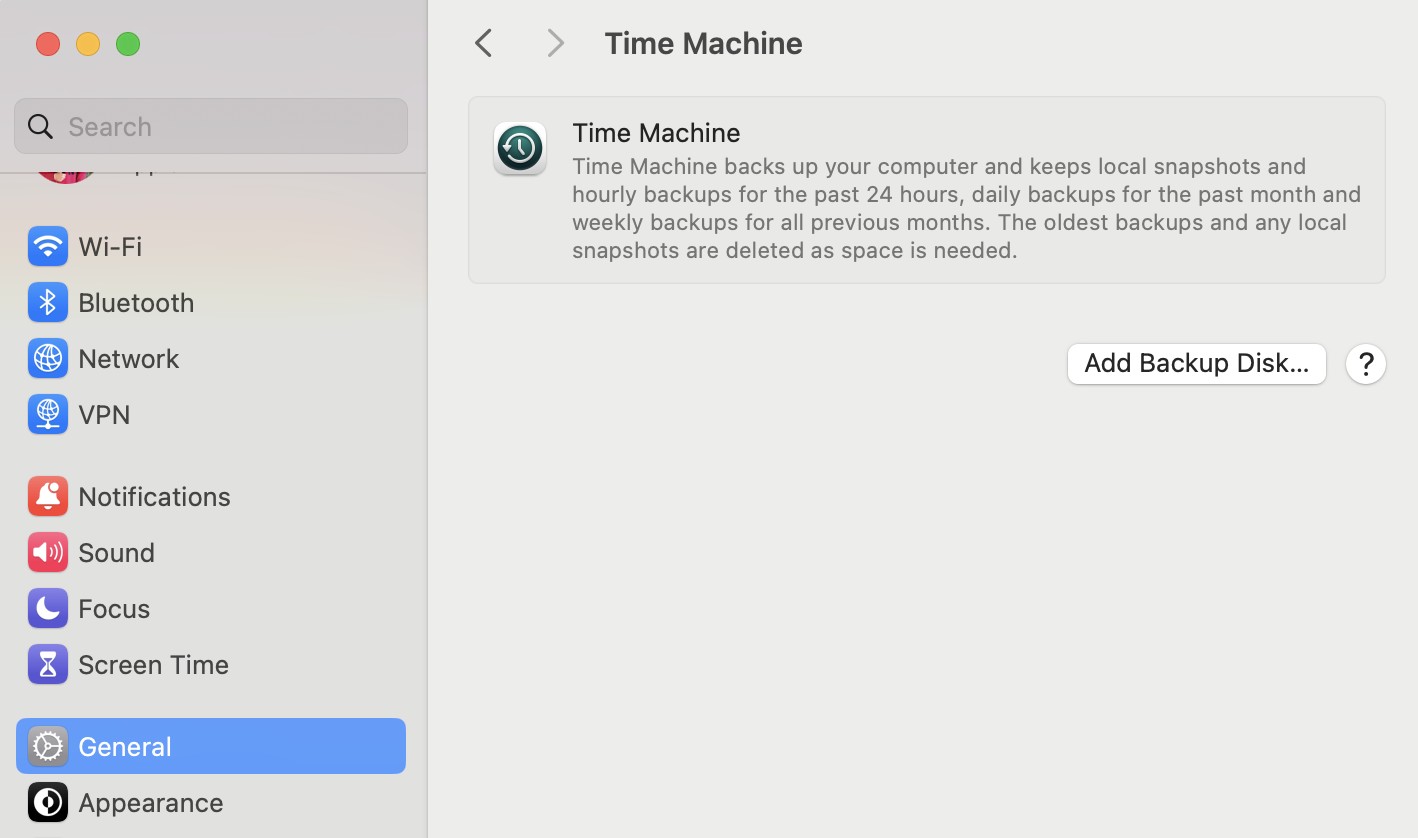
Restoring from a backup ensures you get your actual recordsdata again as they have been earlier than the replace.
Regulate Parallels Settings (for Parallels Customers)
For customers who run Home windows on their Mac utilizing Parallels, there could also be conflicts between Parallels and macOS that conceal recordsdata:
- Open Parallels Desktop and go to your Home windows setting.
- Open File Explorer and find the recordsdata in your shared desktop folder.
- Proper-click on the recordsdata and choose Properties.
- Underneath the Common tab, be certain that Learn Solely and Hidden choices are unchecked. Click on Apply and OK.
- Shut Parallels and test if the recordsdata are actually seen in your macOS desktop.
Parallels can typically have an effect on file permissions, so adjusting these settings can resolve visibility points.
Extra Ideas for Stopping File Loss within the Future
When you’ve recovered your lacking recordsdata, it’s a good suggestion to take some preventive measures to guard your information from comparable points sooner or later. Listed here are a couple of suggestions to assist guarantee your recordsdata keep secure:
1. Common Backups
- Use Time Machine: Arrange computerized backups with Time Machine, which saves copies of your recordsdata and lets you restore them to particular cut-off dates. Join an exterior drive and allow Time Machine in System Preferences.
- Think about Cloud Backups: Along with native backups, think about using cloud storage companies like iCloud, Google Drive, or Dropbox. This supplies an additional layer of safety in case of {hardware} failure.
2. Test iCloud Settings Often
- Go to System Settings > iCloud > iCloud Drive and make sure that Desktop & Paperwork Folders are configured in response to your preferences.
- Disable computerized iCloud administration in case you favor to maintain recordsdata saved domestically in your Mac. This may stop macOS updates from robotically shifting recordsdata to iCloud.
3. Replace All Software program Often
- Preserve macOS Up to date: Common macOS updates usually embrace bug fixes and safety enhancements. Make certain your system is updated by checking System Preferences > Software program Replace.
- Replace Third-Celebration Software program: In the event you use apps like Parallels, preserve them up to date to keep away from compatibility points. Most apps notify you of updates, however you can even test for updates manually by the app’s settings or web site.
4. Restrict Use of Virtualization Instruments
- Virtualization software program can typically trigger conflicts with macOS, particularly throughout main updates. In the event you use instruments like Parallels, preserve your digital machine configurations easy and keep away from syncing essential folders like your desktop throughout programs.
Conclusion
Dropping recordsdata after a macOS replace will be worrying, however with the proper steps, most recordsdata will be recovered. By following the strategies outlined right here, you must have the ability to restore your lacking desktop recordsdata and take steps to safeguard your information sooner or later. Common backups, cautious administration of iCloud settings, and holding your software program up to date might help defend your recordsdata and forestall comparable points from arising. With these practices in place, you may get pleasure from the advantages of macOS updates with out the fear of sudden information loss.